3 (delicious!) Vegetarian Crock-Pot Recipes

Don’t you just love 5pm, when everybody under the age of ten has a nervous breakdown the moment it’s time to start cooking?  Me too.  Which is why I’m such a fan of crock-pot cooking.  Unfortunately, it can be tough to find healthy crock-pot recipes that call for natural ingredients.  Hello, Cooking Light magazine!  Every week I’ve been trying one new vegetarian crock-pot recipe from their list of fourteen.  These are my 3 favorites:

Tofu and Chickpea Curry oh3657p175-tofu-chickpea-curry-l
2 cups cubed peeled sweet potato
2 cups small cauliflower florets
1 cup chopped onion
1 Tbsp curry powder
1 Tbsp brown sugar
1 Tbsp grated peeled fresh ginger
1 ¼ tsp salt
2 garlic cloves, minced
1 (16 oz) can chickpeas, rinsed and drained
1 (15 oz) can diced tomatoes, undrained
1 (14 oz) can coconut milk
1 package extra-firm tofu, drained (I used 2 packages)
1 Tbsp canola oil
3 Tbsp chopped fresh cilantro

  1. Place first 11 ingredients in slow cooker; stir well. Cover and cook on LOW for 5 hours or until vegetables are tender.
  2. Place tofu on several layers of paper towels; cover with additional paper towels. Press to absorb excess moisture; cut into ½ inch cubes.
  3. Heat oil in a large nonstick skillet over medium-high heat.  Add tofu; cook 8 to 10 minutes or until browned, turning with a spatula. Stir into vegetable mixture in slow cooker. Cover and cook on LOW for 30 minutes.
  4. Sprinkle with cilantro and serve with rice.
    (This curry dish was my favorite of the favorites.  Really yummy, but mild enough that the kids liked it too.)

Barley, Black Bean, and Corn Burritos 
2 cups vegetable or chicken brothoh3657p168-barley-bean-corn-burritos-l
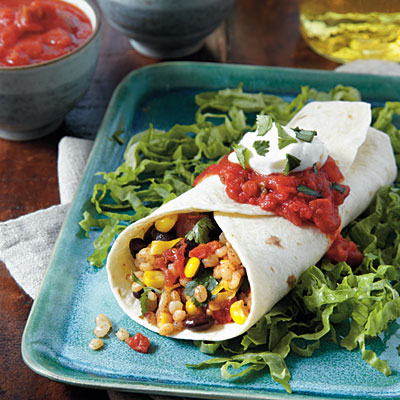
1 cup uncooked pearl barley
¾ cup frozen whole-kernel corn
¼ cup chopped green onions
1 Tbsp fresh lime juice
1 tsp ground cumin
1 tsp chili powder
½ tsp ground red pepper
1 (15 oz) can black beans, rinsed and drained
1 (10 oz) can diced tomatoes and green chiles, undrained
1 garlic clove, minced
¼ cup chopped fresh cilantro
Flour tortillas
Toppings: cheddar cheese, salsa, sour cream, avocado, cilantro

  1. Place first 11 ingredients in slow cooker; stir well. Cover and cook on LOW for 4 hours or until barley is tender and liquid is absorbed. Stir in 1/4 cup cilantro.
  2. Heat tortillas according to package directions. Spoon 2/3 cup barley mixture down center of each tortilla. Add toppings as desired.
    (My husband likes lots of flavor, and this one was his favorite.  It’s a little spicy, but with some sour cream the kids ate it right up.)

Pinto Bean Chili with Corn and Winter Squash
1 tablespoon olive oil oh3657p190-pinto-bean-chili-corn-squash-l
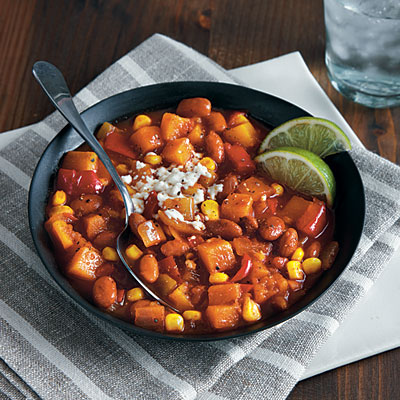
1 ½ cups chopped onion
1 ½ cups chopped red bell pepper
1 garlic clove, minced
2 tablespoons chili powder
½ tsp ground cumin
5 cups cubed butternut squash
3 cups cooked pinto beans
1 ½ cups water
1 cup frozen whole-kernel corn
1 tsp salt
1 (15 oz) can crushed tomatoes, undrained
1 (4.5 oz) can chopped green chiles, undrained
Toppings: sour cream, diced avocado, lime wedges

  1. Heat olive oil in a large nonstick skillet over medium heat. Add onion, bell pepper, and garlic; cover and cook 5 minutes or until tender. Add chili powder and cumin; cook 1 minute, stirring constantly.
  2. Place onion mixture in slow cooker. Add butternut squash and next 6 ingredients.  Cover and cook on LOW 8 hours or until vegetables are tender and chili is thick. Serve with sour cream, avocado, and lime wedges.
    (I thought this one tasted even better the second day.  The butternut squash and corn adds a really nice, slightly sweet flavor.  Unfortunately, it was still too spicy for my kids.  I ended up feeding them the ingredients separately–roasted squash, plain corn, and pinto beans.)

You May Also Like:

10 Tasty Veggies You're Probably Not Eating
10 Tasty Veggies You’re Probably Not Eating
The House That Cleans Itself
How to Make Scrumptious Sushi

Salmon with Peachy Quinoa

P1060089
I spent a little time with Cooking channel’s Brigitte Nguyen this weekend, and after tasting her Chocolate Coconut Rum Cake, I contemplated erasing the entire cooking category from this blog since, let’s be honest, it’s hardly my forte.  But besides wowing me with her culinary skills, Brigitte’s passion for food reminded me that cooking is one beautiful way to take care of a family–regardless of how gifted {or challenged} the cook may be!  In that vein, I thought I’d share one of my new favorite summer recipes, courtesy of Parents magazine.

I first bought quinoa because I kept seeing references to it being the “Supergrain of the Future” and among the “World’s Healthiest Foods.”  Turns out this protein-packed grain contains all nine essential amino acids, twice the fiber of most other grains, and impressive quantities of iron, magnesium, manganese, riboflavin, and lysine. Unfortunately, my kids haven’t been terribly impressed.  But throw in chunks of sweet summer peaches and a tangy homemade vinaigrette and suddenly quinoa’s got a fighting chance!

Uncooked, quinoa is a very small grain and requires a fine mesh sieve for rinsing.

Ingredients:
½ cup uncooked quinoa, rinsed and drained
1 Tbs. lime juice
1 Tbs. minced shallot (I left this out to make it a little more kid-friendly)
1 ½ tsp. honey
¾ tsp. grated fresh ginger
¼ tsp. salt
2 Tbs. extra-virgin olive oil
1 peach, peeled, pitted, and chopped (I used 2 peaches)
½ cup green bell pepper, finely chopped (I used red because it’s sweeter)
4 (4oz) fresh salmon fillets, about 1 inch thick

Method:
1). In a saucepan, combine quinoa and 1 cup water. Bring to a boil; reduce heat. Simmer, covered, about 15 minutes or until liquid is absorbed. Place quinoa in a medium bowl; let cool slightly.
2). Meanwhile, in a small bowl combine the lime juice, shallot, honey, ginger, and salt. Whisk in olive oil. Set aside 1 Tbs. of the mixture in a shallow dish. Then stir the peach, bell pepper, and remaining lime-shallot vinaigrette into the quinoa.
3). Coat the salmon with vinaigrette mixture in a dish. (If I were you, I’d marinade it overnight in the vinaigrette). Grill the salmon on a greased grill rack, or in a heavy nonstick skillet, over medium heat for 8-12 minutes or until the fish begins to flake when tested with a fork. Be sure to turn over halfway through grilling. Serve salmon with the fruity quinoa pilaf.

Nutrition per serving:
328 calories, 26 g protein, 15g fat (2 g saturated fat), 21g carbs, 2g fiber, 6g sugar, 30 mg calcium, 2 mg iron, 198 mg sodium

You May Also Like:

Eating to Honor God
Eating to Honor God
10 Tasty Veggies You're Probably Not Eating
10 Tasty Veggies You’re Probably Not Eating
How to Make Scrumptious Sushi

What’s for Lunch?

photo-7

I don’t know about you, but I think lunch is the most boring meal of the day.  I am always looking for a little inspiration beyond “deli meat or peanut butter?”  So let me share one of my favorite go-to lunches.  It’s easy to make, loaded with vegetables, and my kids love it.  Best of all, it can be made ahead of time and chilled, so when you walk through the door at 12:30 and everyone’s cranky and starving you can say, “There’s pasta salad in the fridge!”

HOORAY!

Here is the super-simple method:

1. Choose your ingredients.  My family likes:

  • grilled chicken
  • broccoli
  • cauliflower
  • red bell pepper
  • carrots
  • kidney beans
  • avocado
  • asparagus spears
  • grape or cherry tomatoes
    (sometimes I put all of this in, and sometimes I just use what I’ve got)

These are some other things you might like:

  • mushrooms
  • olives
  • artichokes
  • black beans

2. While you boil the noodles (I use tri-color rotini), set a steam tray over the pot and lightly steam the crunchy vegetables (broccoli, cauliflower, asparagas, and carrots.)

3. Once you’ve drained the noodles, return them to the large pot and throw in the steamed vegetables.  Add the beans, grilled chicken, avocado, and any other uncooked vegetables (bell pepper, olives, mushrooms, tomatoes…etc.)

4. Toss with your favorite Italian dressing.  I either use Olive Garden dressing (bought from Sam’s Club), or Good Seasons Italian Salad Dressing & Recipe Mix, which you can buy at any local grocery store.  It comes with a glass jar that tells you how much water, vinegar, and oil to add.  Very delicious.

5. Chill and serve.
photo-8Bon appétit!

Kid-Friendly Veggie Night

Cracker-Barrel[1]I mentioned in a previous post, (which one friend has affectionately termed my “psychotic food manifesto”) that we have a weekly veggie night at our house.  I was inspired by Cracker Barrel since my kids love their “veggie plate,” which is really just four sides of your choice.  I figured I could do the same thing at home for a little less money and a lot less butter.  So I made a list of all our favorite Southern-style sides, and each week I pick four or five from the list below.  It’s kid-friendly, cheap, and relatively simple to prepare.  I explained how to prepare some of the less common vegetables in a previous post, and have linked them accordingly.  Just to be thorough (and not to insult your intelligence!) I’ve briefly explained how I prepare the other sides.

  1. Baked Sweet Potato–bake at 400° for about an hour and sprinkle with cinnamon.  (A tip I learned from my MIL: If you want to eat the nutrient-packed skin, rub it in olive oil.  It’ll keep it extra moist and tasty.)
  2. Biscuits/Cornbread–a “reward” for eating all the veggies 🙂
  3. Cinnamon Apples—you can mix fresh apples with some cinnamon and brown sugar and microwave them until soft, or toss them in olive oil and bake them at 400 until soft
  4. Collard Greens—I’ve linked this to my original post, but must share that a reader introduced me to Goya Ham Stock as a tasty alternative to chicken broth for collard greens.  Great tip!
  5. Corn on the Cob/Cream Corn—chop the kernels off the cob, then run the dull side of the knife blade over the cob to scrape out any milk.  Sauté kernels in butter 3-5 minutes.  Add some milk (or half and half), salt and pepper to taste.  Mix cornstarch with cold water and spoon some into the corn to thicken.
  6. Fried Okra—it’s a lot of work to make fresh, so I buy this frozen and sauté in olive oil
  7. Green Beans—simmer in chicken broth until tender (it’s also tasty to add chopped red potatoes and carrots and simmer it all together)
  8. Honey Carrots—steam carrots, then toss lightly in butter and honey
  9. Kale
  10. Lima Beans/Butter Beans—simmer frozen beans in chicken broth until tender (in traditional Southern fashion, you can add “fat back” using bacon or ham if you want extra flavor.  For a lighter version, omit the fat back)
  11. Macaroni and Cheese (recipe following)
  12. Rutabagas
  13. Squash Casserole (recipe following)
  14. Turnip/Mustard Greens

Macaroni and Cheese
(My friend, Amy Pearson shared this family recipe, and it’s my favorite!  Thanks Amy!) 

6a00d8341c660253ef00e54f5ec6a68834-800wiIngredients:
1 ½ cups elbow macaroni
2 cups small curd cottage cheese
1 cup sour cream 1 egg, lightly beaten
8 oz. sharp cheddar cheese
salt/pepper to taste

Steps:
1. Boil and drain macaroni according to package directions.
2. Meanwhile, combine all other ingredients in a large bowl.
3. Mix together with cooked macaroni and bake uncovered at 350° for 45 min.  Let stand 5 min. before serving.

(Photo credit)

Squash Casseriole
(This delicious recipe comes from the Macon Jr League Cookbook: “Gracious Goodness.”)

squash-casserole-in-dish-mIngredients:
3 cups yellow squash, cubed and steamed until soft
4 Tbsps chopped onion
1 tsp salt
¼ tsp ground pepper
3 Tbsps butter, melted
2 eggs, beaten
1 cup saltine crackers, crumbled
1 cup shredded cheddar cheese
1 cup scalded milk

Steps:
1. Grease a 2-quart baking dish and preheat oven to 350°
2. Combine all ingredients in large mixing bowl, except milk.
3. Microwave milk for 1-2 minutes (to scald) and pour into bowl.  Mix well.
4. Pour into prepared baking dish and bake for 1 hour.

(Photo credit)

Do you have any family dinner traditions?  Or any tasty Southern veggies we can add to the list?  Feel free to share–I’m always on the hunt for menu inspiration!

Eating to Honor God: Part 2

001

It’s time to get practical.  In my last post, I shared a personal theology of eating.  The challenge has been to translate this theology into a daily reality.  Realistically I know that changes in lifestyle take time, so I’ve created a plan that can be implemented in stages.  Please know I am NOT equating this particular plan with godliness!  It’s a vision for our household given our current struggles, habits, and goals.  I don’t know where you are in your philosophy of eating—you may grind your own whole grains in the basement, or you may pat yourself on the back when you buy baked Doritos.  I most certainly leaned toward the latter.  But regardless of where you’re coming from, my thoughts are meant only to be a launching pad.  You, more than anyone else, know what will bless and benefit your family the most.

That being said, my family plan includes five steps.  Along the way, I’ve noted corresponding biblical principles in red, as a means of ensuring that my plan does in fact reflect my theology.  As a reminder, here are the six biblical principles regarding eating from my previous post:

  1. We are called to eat for God’s glory.
  2. We are called to be free from legalism.
  3. We are called to be faithful stewards of our bodies.
  4. We are called to humility.
  5. We are called to seek refuge, comfort, and satisfaction in God alone.
  6. We are called to serve others.

With God’s help, this is the plan I want to implement in our home:

Step One: Establish and maintain an eating schedule. 
In my opinion, eating at fixed times throughout the day helps children realize that food has a purpose.  It’s meant to fuel the body, not calm cranky souls or entertain restless spirits (principles 1 & 5).  I’ve also seen that established meal and snack times can promote healthier eating (principle 3).  When kids graze all day, they’re more likely to be picky at meal time since they’re not really hungry.

Establishing and maintaining an eating schedule can benefit adults as well.  If I determine that I’ll eat three meals a day with two scheduled snacks, and then I find myself eating at an irregular time, I’m forced to ask why.  If the answer is that I’ve just exercised and I’m extra hungry, no big deal—I’m not a slave to legalism! (principle 2)  But if the answer is that I’ve been thinking about that big fat problem and I’m feeling anxious, then I need to put the trail mix down and go to the Lord (principle 5).

Step Two: Get rid of processed snacks.
AAAAAAAAAAAHHHHHH!!!
Okay, now that I’ve gotten that out of my system, let me remind myself (and you) that we have been called to be faithful stewards of our bodies (principle #3).  Truthfully, processed foods are harmful to the body.  Gloriously convenient, but harmful just the same.  We can do better!  Here’s my list of whole food alternatives, divided into three categories depending on the day:

We’re late—eat in the car!

A Typical Day

Supermom planned ahead!

Pre-packaged Raisins Yogurt (go for Greek—it’s got twice the protein) Sweet Potato Fries (chop, toss in olive oil, and roast at 400 for 15-20 min.)
String Cheese Fresh Fruit Smashed Sweet Potatoes with Butter and Cinnamon
Nuts and Dried Fruit (3 yrs+) Natural   Applesauce Steamed Edamame
Rice Cakes Raw Veggies and Hummus Hard-Boiled Eggs
Pretzels or All-Natural Crackers Whole Grain Toast and Jam A Home-Baked Treat (muffins, pumpkin bread…etc.)

Listen, if you want to feel overwhelmed, google “Whole Food Snacks.”  There are people who earn their livelihood blogging about every possible way to make a cookie without adding sugar.  If you’re feeling adventurous, give it a shot.  Your snack list can be a lot more exciting than this, complete with homemade organic pop tarts.  But if you’re like me, take a deep breath, and don’t sweat it.  Remember: this is a process.  No need to get your panties in a wad over where to buy agave syrup and brown rice paste yet.  Baby steps.

One more thought—the easiest time to exercise discipline is when you’re in the grocery store.  It’s much easier to say “no” to Oreos when they’re on the store shelf as opposed to the pantry shelf.  What’s more, I don’t think you have to get rid of all packaged snacks in order to be healthy.  A lot of whole food gurus recommend that you simply learn to read labels.  Your goal is to find snacks containing food ingredients you’ve actually heard of, like “wheat flour” and “sesame seeds” as opposed to “thiamine mononitrate.”

Step Three: Create a whole food breakfast and lunch menu. 
Have you ever felt like you scarcely cleaned up the breakfast dishes before pulling out the sandwich bread for lunch?  Me too!  All the time, in fact!  Creating a breakfast and lunch menu can help on two fronts.  It reduces some of the stress of meal preparation, making for a more joyful servant-Mama (principle 6), and it ensures that you’ll feed your family healthy meals (principle 3).

BREAKFAST

LUNCH

Homemade Granola with Milk or Yogurt Peanut Butter & Jelly (fruit & veggie on the side)
Toast with Peanut Butter & Fruit Grilled Cheese (fruit & veggie on the side)
Eggs, Toast (or plain Cheerios), and Fruit Homemade Chicken Salad on Toast or with Pretzels
Hard-Boiled Eggs and Mini Muffins (banana, pumpkin, bran…again, you can google a thousand   healthy muffin recipes) Spaghetti with whole wheat pasta, ground turkey and spinach in the sauce.
Cottage Cheese Pancakes–my mom’s recipe:
Beat   together 3 eggs, ½ cup milk, and 3 Tbsp vegetable oil.  Stir in ¾ cup flour and 1 ½ cup cottage   cheese.  Cook on a hot griddle.  (I hate cottage cheese, and I LOVE these   pancakes!!  The cottage cheese melts and the end result reminds me of a thick crepe.  A FAVORITE in our house!)
Pizza Burgers—Put leftover spaghetti sauce on whole wheat English muffins, topped with mozzarella cheese (fruit & veggie on side)
Veggie Platter—Pick 3 or 4 kid-friendly veggies (broccoli, cheesy cauliflower, green   beans, sweet or white potatoes, peas, corn…etc.)
Steel-Cut Oatmeal –My mom’s trick has always been to add a little flaxseed and wheat bran into the mix after it’s made.  For most babies, a mashed banana will make it sweet enough.  For toddler and you (who are old enough to know better), sweeten it with honey, maple syrup, or brown sugar & cinnamon. Black Bean Quesadillas—Put black beans and cheddar cheese between two whole wheat quesadillas and warm on the stove until cheese melts.  Serve with salsa and a veggie.
Chicken Wraps—Fill a high-fiber, low-carb veggie wrap (I buy them at Sam’s Club) with fresh chicken, lettuce, tomatoes, cheese, and hummus OR use the wrap to make a quesadilla with chopped chicken, cheese, and spinach.

P1050968

Cottage Cheese Pancakes

Step Four: Plan a weekly dinner menu. 
Again, this preparation helps me serve my family more joyfully (principle 6) and healthfully (principle 3).  I employ a simple strategy to speed things up: I think in terms of the same categories every week.  For instance, once a week we have church small groups and once a week we eat out as a family or go on a date.  That leaves me with five meals to plan per week.  So I have five categories:

  1. Freezer-Friendly Meals—Every week I choose one freezer-friendly meal and cook a double (sometimes triple) portion, freezing the extra for another night.
  2. On the Grill—Because grilling is so healthy and so EASY, I plan one grilled dinner a week.  Usually it’s as simple as Clint grilling the meat while I roast some vegetables.
  3. Veggie Night—I was inspired by Cracker Barrel to institute veggie night.  I made a long list of vegetables that remind me of Cracker Barrel (with a little less butter).  Each week I pick five items off the list for our veggie night.  Believe it or not, this is usually one of the most popular nights of the week, because like Cracker Barrel I include items like homemade “macaroni and cheese” and “cinnamon apples” on my list of “vegetables.”
  4. Frozen Meal—Because of my first category, once a week I’m able to pull out a previously frozen, homemade meal for a no-cooking night.  Hooray!  (And we didn’t even have to buy a Stauffer’s lasagna!)
  5. Other—This is my “miscellaneous” category.  I may choose to make an extra freezer-friendly meal to bulk up the stock pile, plan a meal according to what’s on sale, pull out a favorite recipe, make a crock-pot dish, or try something new.  Often, the grandparents will invite us over and that works too!

Step Five: Grow in Creativity.
Eventually I want to take small steps toward healthier, tastier recipes for the sake of whole-hearted service (principle 6), sound nutrition (principle 3), and doing all things to the best of my ability for God’s glory (principle 1).  I haven’t begun to explore this yet.  Honestly, I’m still struggling my way through steps 2 & 3 right now, reminding myself daily that I am free in Christ and not bound by legalism!  But in the future, by God’s grace, I look forward to seeing growth.

A Final Word 
I want you to know that a crucial component of my plan is embracing the freedom to break every single “rule” at any given time.  I’m happy for my kids to have treats in the nursery and candy bars when Grandma visits.  I’m happy to break our eating schedule to surprise Daddy at work with ice-cream.  My point is, I don’t want to be a slave to anything, least of all a man-made plan.  I feel so strongly about this that initially I included a specific list of “freedoms” at the end of each step, but for the sake of brevity, deleted it.  (I know what you’re thinking—the brevity ship set sail a long time ago.  I apologize.)  That’s the last point I wanted to make—eat intentionally, and eat with freedom.  Eat to honor God.

Eating to Honor God: Part 1

P1040396

Three months ago my documentary-loving husband put the movie Forks Over Knives on our Netflix queue.  Hoping for an action flick, I was bitterly disappointed when it arrived in the mail, but nevertheless we watched it.  About thirty minutes in, Clint was clutching his heart, certain it would stop beating at any moment.  If you’re unfamiliar with the film, it uses scientific and medical research to champion a Vegan lifestyle.  The movie underscores the link between processed, animal-based foods and cancer, heart disease, diabetes, and other illnesses.

When it ended, Clint was inspired.  “Let’s do it!”  He declared.  I was woebegone.  As the family cook, the thought of re-structuring our entire diet was not only daunting, but depressing.  But I couldn’t shake the guilt I felt, especially toward my children.  If I know that highly-processed foods are so unhealthy for my little ones, why do I still hand them out?  “Convenience” hardly seemed a suitable answer when their health was at stake.  So, I resolved to take baby steps toward healthier eating.  For three months I’ve been struggling along, until it finally dawned on me to ask the question, “What does the Bible say about eating?”

The moment I started to explore the topic, I grew encouraged.  The ocean of fad diets and whole-food-blogging-gurus slowly gave way to a stable and steady shore, one that promised to guide me with Truth, not trends.  In the end, I narrowed my study to six principles, probably not comprehensive of all the Bible has to say about eating, but the best I could do:

  1. We are called to eat for God’s glory.
    The first thing I saw is that eating to honor God is a biblical mandate.  I Corinthians 10:31 says, “So, whether you eat or drink, or whatever you do, do all to the glory of God.”  As Christians, everything related to food—from what we eat to the attitude we have while preparing it—should glorify God.
    .
  2. We are called to be free from legalism.
    In the Old Testament, there were “unclean” foods that Jews were forbidden to eat.  Then, in Acts 10:9-16, Peter had a vision in which God declared the unclean food, “clean,” telling Peter to “Rise, kill, and eat.”  Symbolically, God was preparing Peter to receive Gentiles into the faith, declaring that He has made them “clean.”  As believers in Christ, there is no longer any food “forbidden” to us.  We do not have to plan our weekly menu enslaved by legalism, or as I like to think of it—I don’t have to feel guilty if I get in a jam and choose to order a pizza now and then.  We have been set free, called to freedom (Galatians 5)—therefore, I don’t want my philosophy of eating to be enslaving.
    .
  3. We are called to be faithful stewards of our bodies.
    Although we are permitted to eat anything, the Bible reminds us that our “body is a temple of the Holy Spirit” (I Corinthians 6:19) and we are to present it as a “living sacrifice, holy and acceptable to God” which is an act of worship (Romans 12:1).  Exercising wisdom and self-control in eating demonstrates faithful stewardship.  This is an especially serious responsibility for parents of small children, because they are entirely dependent on us to feed them.  They can’t make a grocery list, go to the store, and buy healthy foods.  They eat what they are given.  Therefore, we are accountable as stewards of their bodies.  (Yikes, I know!  My thoughts exactly.)
    .
  4. We are called to humility.
    Personally, I think the subject of food is particularly sensitive for women.  It’s a tender topic for numerous reasons—it’s tied to our abilities as a homemaker, our body image, our parenting style, our organization and planning (or lack thereof).  And because of this, it can become a source of pride for those who make it their pedestal.  But clearly God opposes both pride and judgment (James 4:6, Matthew 7:1).  So as we create our philosophy of eating, let’s remember that we can be an all-natural, organic superstar, but if we harbor a spirit of pride, we’re losing on the front that really counts.
    .
  5. We are called to seek comfort, refuge, and satisfaction in God alone.
    We must examine our motives for eating.  Repeatedly the Bible speaks of God being our only true refuge and comfort (Psalm 46:1, 91:2, 2 Corinthians 1:3-5).  Yet it is tempting to use food as a false refuge, seeking the comfort of a warm brownie, or eight.  At the same time, we can sin in the opposite direction by seeking satisfaction through not eating. So the question is why am I making these food choices?  Am I doing it to honor God, or to fill an empty place?  To honor God, or to seek a worldly self-image?  To honor God, or because I am in bondage to fear of disease?
    .
  6. We are called to serve one another.
    Finally, we must take a brief stop at the home of the Proverbs 31 woman, who “rises while it is yet night and provides food for her household.”  What a girl.  One of the things I hate the most about myself is that when I’m preparing food I often morph from “normal” Jeanne into “angry-bear-get-out-of-my-way-I’m-COOKING!!!” Jeanne.  The thought of this woman (with no stove, dishwasher, or microwave) rising while it is still night to prepare food is deeply challenging.  Here is a woman who embraces food preparation as service to her family and her God.  If you’ve ever been around a woman like this, you know how beautiful it is.  My mother-in-law is one such woman, and on many pre-holiday occasions I have quietly chopped vegetables alongside her and marveled at her whole-hearted, unselfish delight in ministering to her family via the humble avenue of food-preparation.

There you have it—the groundwork for my rudimentary theology of eating.  So, how does this translate practically?  Honestly, I struggle with all six principles.  Nevertheless, in our household I am the primary meal planner, grocery shopper, and chef (although I do have a cute dishwashing boy) 🙂

Since I hold so much sway over our eating habits, I am in the process of drafting a plan to align our practical habits more fully with these biblical principles.  Because this post is growing longer by the second, I will post my practical plan separately.  Until then, I welcome your feedback.  As always, it is great fun journeying with you!

10 Tasty Veggies (You’re Probably Not Eating)

Happy New Year!  Are you ready to purge your body of the truckloads of refined sugar you’ve consumed in the past few weeks?  Me too!  If you’re planning your weekly menu and are bored to death with broccoli, allow me to introduce ten humble vegetables.  Who knows?  There may be a new family favorite just waiting to be discovered.

CrossFitRoots_BokChoy[1]Bok Choy
I grew up on this leafy Asian vegetable, easily found in most grocery stores.  It’s especially tasty when thrown into your favorite stir-fry dishes, although it can be prepared as a stand-alone side dish too.  Rinse the leaves, then cut the bok choy as you would romaine lettuce, starting from the leafy greens and working your way down to the white stalk.  I usually only keep about half the stalk, since it’s less tasty than the greens.  My mother would saute garlic, add the bok choy and a little water, and cover the pan so it lightly steamed.  It cooks quickly, so in a few minutes she’d add a little oyster sauce and garlic pepper.  That’s it!  You can also find baby bok choy (which looks exactly as you would imagine) in some grocery stores.  If you see it, grab it–the leaves are softer and more tender than the “adult” version.

roasted-brussels-sprouts-fd-lg-1[1]Brussel Sprouts
Brussel sprouts look like baby cabbages and, in my opinion, are best when roasted.  Rinse them, then trim off the bottom.  You will lose the outer layer of cabbage leaves, but that’s fine since they’re usually less fresh anyway.  Next, cut each brussel sprout in half, making sure not to cut down the main vein of the cabbage leaf.  (You’ll know if you’ve cut the main vein because the whole thing will start coming apart!)  Toss them with olive oil, salt, and pepper.  Spread them on a baking tray and cook at 375° for  about 15 minutes.  Keep an eye on them–when the tops are beginning to brown, they’re ready.

swisschard-bright-lights-from-all-natural-mama-blog-shade-plants-blog[1]Chard
This beautiful veggie is one of my husband’s all-time favorites.  Unfortunately, it’s expensive and you’ll probably have to go to Whole Foods, Publix, or Fresh Market to find it.  There are several types of chard–swiss, ruby red, rainbow–but all are readily recognizable by the brightly colored stalks and red veins running through the leaves.  Here’s how Clint’s mom prepares it: Start with 3 lbs. of chard.  Slice stalk in ¾ inch pieces.  Strip leaves and slice.  Saute 4 garlic cloves in olive oil.  Add stalks and cook 5-6 minutes.  Add leaves and sprinkle lightly with sugar.  Cover and cook until wilted, about 4 minutes.  Uncover, cook until liquid evaporates.  Stir in red wine vinegar, salt and pepper to taste.

collard-greens[1]Collard Greens
I will admit, of these ten vegetables, collards are probably my least favorite because I think they’re tricky to cook.  Unlike turnip greens or chard, the leaves are tough.  Nevertheless, when properly prepared, they’re delicious.  First strip the leaves and discard the stalks.  Wash thoroughly.  I like to cook them in chicken stock since it’s lighter than good-old-fashioned “fat-back.”  Simmer them in the stock for 30-45 minutes depending on taste.  You can add smashed garlic or a slice of bacon, if you like, but neither are necessary.

photo70[1]Kailan
Now this is my favorite!  The one draw-back to Kai Lan, also known as “Chinese broccoli” is that it’s usually only found in Asian grocery stores.  But it’s worth the visit!  The actual bud that looks similar to broccoli is very small; the majority of the vegetable is leafy.  To prepare, rinse and chop just as you did the Bok Choy, only keep all of the stalk.  Stir fry with lots of garlic and an Asian sauce of your choice.  (I was raised on Oyster sauce and will always be partial to it).

kool-kale[1]Kale
The best way I can describe Kale is to say the leaves are really “crinkly” and can be green or purple.  When roasted properly, Kale can be as light and crispy as potato chips, my favorite way to eat it.  Here’s what to do: First, rinse the leaves and cut off the stalks.  Then cut leaves into chip-sized pieces.  Toss lightly with olive oil and salt.  Lay leaves on a baking tray with plenty of room so they’re not touching.  Pop them in the oven on 375°, and keep an eye on them because they can burn quickly (this I know from experience!)  They’re ready when crispy and just beginning to brown.  Clint’s mom puts out a plate of them when we’re having burgers, and they disappear as quickly as chips!

Mustard_Greens[1]Mustard Greens & Turnip Greens
I put these together since that’s the way I like to eat them.  I buy two bunches of turnip greens and one bunch of mustard greens.  turnip-greens[1]It will look like a ton of vegetables, but like most leafy greens, they cook down considerably.  While you’re at the store, pick up a turnip root–it will be white and bright purple. (Some whole food stores sell the turnips still attached to the root).  First strip the leaves and discard stalks.  Typically the leaves are really sandy, so you may want to fill your sink with water and dump the leaves in as you go.  Next peel and dice your turnip root (it will take some of the bitter kick out of the greens).  Simmer the greens and root in chicken stock for around 30 minutes.  Again, you can toss in garlic or a strip of bacon if you like.

napa_cabbage[1]Nappa Cabbage
Nappa Cabbage, also known as “Chinese cabbage” can be steamed or stir-fried.  Rinse and chop it just like bok choy (again, I don’t keep all of the white stalk).  My favorite way to prepare it is with tofu.  First I stir-fry tofu and garlic, then add a bunch of vegetables: nappa cabbage, bok choy, broccoli, carrots, and green beans.  Add a little water to the pan, cover, and let the veggies steam.  When they’re cooked, season with an Asian sauce of your choice and serve over rice.

rutabaga[1]Rutabagas
Not the prettiest vegetable, but one of my baby’s absolute favorites.  Rutabagas are cheap, readily available, and easy to prepare.  All you have to do is peel off the thick waxy skin, dice the rutabaga (these two steps can be done in the morning to save you time later), and simmer in chicken broth until tender.  Add a dollop of butter while it cooks and serve alongside other southern-style veggies.

Happy eating!

How to Make Scrumptious Sushi

025

A few years back, my husband and I got ambitious and decided to host a sushi-making party.  The only problem was neither of us knew how to make it.  Thus began our research.  Over the years we have…well I should really say I have…perfected the art of sushi making.  (Clint has perfected the art of sushi consumption).  Stay-at-home-sushi-date-night has become one of our favorite traditions.  Since the kids aren’t as tickled over sushi as we are, we put them to bed, share a bowl of soy sauce, and dip, chomp, and talk to our hearts content.  It’s significantly cheaper than go-out-for-sushi-date-night, not to mention you can wear your pajamas.  And in case you’re feeling intimidated, it’s really not as hard as it looks.

As my husband and I quickly learned when we began our research, the secret to great sushi is in the rice.  In fact the term “sushi” refers to the specially prepared rice, not the fish.  So the first step to making authentic sushi is making authentic sushi rice.  Here’s how to do it:

(Note: The following is not my own original recipe.  Unfortunately, I perused so many different websites years ago that I don’t remember where this particular recipe came from, otherwise I’d give the website due credit.)

Sushi Rice:

Ingredients:

  • 2 cups sushi rice (you can buy sushi rice at Publix, Whole Foods, Fresh Market, or a local Asian grocery store)
  • 2 ¼ cups water
  • ¼ cup rice vinegar
  • 1 ½ tablespoons sugar
  • 1 tsp salt

Directions:

  1. Bring rice and water to a simmer, cover, and cook on low for 10 minutes.  Turn off heat.  Let stand, covered, for 10 more minutes.
  2. Meanwhile, make sushi rice seasoning by mixing rice vinegar, sugar, and salt until dissolved.
  3. Immediately spread the rice on a large cookie sheet, fanning it so that it cools quickly.  (Cooling sushi rice rapidly is the trick to making it sticky.)
  4. Sprinkle with prepared seasoning and let cool completely.

You will also need to purchase Nori, the seaweed paper used to roll sushi.  I usually buy it at Whole Foods or Fresh Market, though if you can find a local Asian store, it will probably be cheaper.  Make sure to buy toasted Nori.  Likely, these stores will also carry sushi mats, the small bamboo mats used for rolling sushi.  Buy one or two and you can use them forever.  The only other items you need are whatever ingredients you like inside your sushi rolls.  Here’s some of the staples we like:

  • Avocado
  • Cucumber
  • Carrots
  • Shrimp
  • Cream Cheese
  • Crab meat (imitation is fine—it’s what’s typically used in California rolls)
  • Smoked salmon (if I’m going to use raw fish, I buy it from a higher end store like Whole Foods or Fresh Market just to be on the safe side)

How to Make a Traditional Sushi Roll:

  1. Chop all ingredients appropriately and lay them out along with sushi rice, Nori, one sushi mat, and a bowl of water.  It is helpful to put your sushi mat inside a large Ziploc bag (or wrap it in plastic wrap) to prevent rice from being smashed in between the bamboo slats.
  2. Cut one sheet of Nori in half horizontally.
  3. Lay the Nori shiny side down on your bamboo mat.  Dampen your hands in the bowl of water and spread a thin layer of sushi rice on top of the Nori.  (The thinner the better!  Putting too much rice on your Nori will make the roll fat, and difficult to “seal.”)  The rice is very sticky—use the bowl of water as necessary.
  4. Next, lay ingredients in a straight line on top of the sushi rice about an inch from the edge.
  5. Beginning at the edge the ingredients are closest to, roll the Nori one time around the ingredients as tightly as you can.  Your goal is to lock all ingredients under the edge of the Nori.  Once you have done this, roll it a final time to seal it off.  If you cannot seal it because the ingredients are spilling out, you’ve made it too fat…and as my husband would say, it’s now a burrito roll, and you should eat it accordingly 🙂
  6. Finally, slice the roll into 8 pieces.

How to Make an Inside-Out Sushi Roll:

  1. A California Roll is one example of a common inside-out sushi roll.  To do this, follow steps 1-3 above.
  2. Once your rice is spread on top of your Nori, flip the whole thing over so that the rice is against the bamboo mat.  (For this roll it’s imperative you put your mat inside a Ziploc bag or cover it with plastic wrap).
  3. Now the Nori should be face up.  Line your ingredients along the Nori, then roll tightly as instructed above.  You can add slightly more ingredients to an inside-out roll then a traditional roll and still be able to seal it.  You can also sprinkle an inside out roll with sesame seeds or roll it a final time in salmon eggs (the bright orange stuff) if you want to be fancy!

Some of Our Favorite Homemade Rolls:

Traditional California Roll—imitation crab, avocado, cucumber, and carrots

Giada’s California Roll—imitation crab, avocado, and mango

Salmon Roll—smoked salmon and cream cheese

Spicy Crab Roll—shred some of your crab meat and mix with mayo, cayenne pepper, and chili powder; spread mixture evenly on top of rice before rolling

Seafood Roll—crab, salmon, shrimp, cream cheese, and avocado—often we make this a HUGE roll by using a whole sheet of Nori instead of a half sheet.  We slice the finished roll into ten pieces instead of eight so each piece is thinner.

Veggie Roll—avocado, cucumber, carrots, blanched asparagus

The sky’s the limit when it comes to creating sushi rolls.  One of the most fun things about homemade sushi (besides the joy of gorging yourself on cheap sushi) is the fun of creating it.  For this reason, it’s a great idea for a social gathering.  Throw out an array of ingredients, let everybody build their own, and enjoy the tasty creations you come up with!  Mmmmm…..